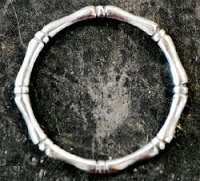
Make these fun and beautiful, hand fabricated, BAMBOO STACKING RINGS! This Tutorial has been reprinted from “Jewelry Making Daily” and is by Elizabeth Ann Tokoly

This classic, elegant ring builds on simple metalsmithing techniques – forming, soldering, filing – but demands a degree of proficiency and attention that can challenge the beginner or advanced beginner. After the ring is formed and soldered, the bamboo texture is slowly revealed through scoring and filing.
With one ring made, you can create more in other metals, make several to hone your skills, or have the original cast in multiples.
This design works well for stack rings.
Once mastered, the bamboo effect may also be used for bracelets, or earrings.
Tools and Materials for this Project:
- Compass
- Scribe
- Graph paper and pencil
Hand Tools:
- Saw frame and #2/0 blade
- Three-square (triangle) needle file
- 8″ crossing file
Other Tools:
- Flex Shaft
- Bench vise
- Black, Blue and Pink silicone wheel polishers
- Small muslin buff on a mandrel
- Zip (or Rouge) polishing compound
Step 1

With a compass, draw a circle on graph paper slightly smaller than the inside diameter of your ring. Divide the circle into eight equal parts. Label the circle North, South, East, and West, then North East, South East, etc. Important: Always work off the North point when positioning the score lines on the ring shank in the next step.
Step 2
Lay your ring on top of the drawn circle. At the North point, scribe a vertical line on the ring. Score that line completely around the ring stock using a 2/0 saw blade. Turn the ring a quarter turn so the previously scored line is facing East. Scribe and score again at the North point. Turn another quarter and scribe/score again on the North point. Repeat to divide ring into four equal parts.
Step 3
Position the ring back on the paper template. Scribe a line between North and East. Score that line around the shank using a 2/0 saw blade. Using North East as the new scribing/scoring point, turn the ring to face South East and repeat. Repeat until the ring is divided into eight equal parts.
Step 4
One millimeter to the right of each scored line, scribe a second line. Score all around the shank using the 2/0 saw blade. Note: The second line should not be exactly parallel to its neighbour–it should taper toward the centre point of the ring.
 Step 5
Use the triangle file to cut V-shaped grooves in every scored line. Use the crossing file to round the sides of the V grooves. Note: The higher side of your crossing file should face out toward each of the segments.
Step 6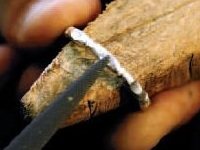
Use the high side of the crossing file to create the curved bamboo shape. Starting in the centre of each segment, file a shallow U-shape in it. Do this in all eight sections.
Repeat this process on both sides of the ring to taper each segment all around the shank.
Step 7
Fasten the flex shaft hand piece into the vise. Using a BLACK silicone wheel rough out the remainder of the bamboo shape. Smooth the marks with the BLUE silicone wheel. Then, smooth the marks further with the PINK silicone wheel.
Step 8
Finish the ring with the muslin wheel loaded with Zip finishing polish (or rouge).
Or put in the tumbler for polishing with steel shot.
This ring also looks great with some patina (Liver of Sulphur) before tumbling to bring out the relief work!!
All the Silver, Tools and Supplies needed to make these rings are available on this website. Thanks for shopping!!
Workingsilver.com supports your creativity. This, and all our Tutorials are FREE!
Have fun creating!! Workingsilver.com helps you make beautiful jewellery!!