This project develops skills in sawing, pierce-work, overlay, sweat soldering, bezel-making, stone setting, and finishing techniques. You can adapt it to different shaped pendants with different pierced-work patterns to complement your stone. The illustrated pendant has a hook, rather than a completely closed, bail so that it can be snapped onto chains regardless of the size of the chain’s end findings. A larger hook could be made if the pendant is destined to be attached to an already formed necklace of beads. I suggest you read all the steps before you begin.
NOTE: Silver solder gives off toxic fumes when melted, and polishing compounds are harmful to your lungs, so use good ventilation that takes the air away from your face when soldering or machine-polishing.
The tools you will need are: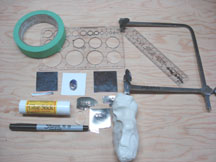
- Stone cabochon (the one I used was 2 cm x 1 cm).
- 1 piece of 0.75mm or 22 gauge sterling silver just a little larger than the size of the finished pendant (I used a piece 4.5 x 4.5 cm).
- 1 piece of 0.50mm or 24 gauge sterling silver just a little larger than the size of the finished pendant (I used a piece of 4.5×4.5cm)
- 1 strip of 0.75mm or 22 gauge sterling silver for a bail (I started with a 4cm x 4mm strip).
- A length of fine silver rectangular bezel wire long enough to wrap around the edge of the stone with about 1mm overlap. 0.4mm thick wire was used in this project, but I prefer thicker wire if you can find it. If your stone has straight sides, make sure the bezel wire is wide enough to be bent over the top edge of the stone; if your stone has curved sides, the bezel wire needs to come high enough up the side of the stone that it will hold the stone when pushed against it.
- Hard, medium, and easy silver solder.
- A template to draw a circle, oval, or other shape around your stone.
- A piece of thin white paper (such as regular computer paper) and a fine-tipped pen.
- Glue stick.
- Painter’s masking tape.
- Ruler.
- Jeweller’s saw with fine blade (I used 3/0).
- Metal snips.
- Small ball-pein or chasing hammer.
- Round-nosed pliers and flat-nosed pliers or a plastic-jawed vice.
- Large and small files.
- Sandpaper (about 360 and 600 silicon carbide grit; also finer grits or steel wool if a satin finish is desired).
- Firescale-preventing flux and a small firm paintbrush (one that does not easily lose hairs) or fine mist spray bottle.
- Pickle solution (I use sodium bisulphate, sold for swimming pools as PH Minus, warmed in a small, lidded, crock pot, adding about 1 part crystals to about 6 parts water – always add acid to water, not the other way around).
- Torch (I used a “shark” propane torch).
- Soldering pick (a sharpened titanium bicycle spoke works well as does a sharpened piece of metal coat hanger).
- Flexible shaft machine (I used a Foredom) with sanding and polishing silicone wheels and/or small fabric or felt wheels that can be charged with compounds such as Graystar, Tripoli and rouge. A polishing machine with 3-4” muslin and flannel wheels is desirable if you want a mirror finish on the back of the pendant.
- 1mm ball bur.
- Silver blackening solution
Step 1
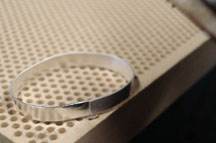
File one end of the bezel wire so that it is 90 degrees to the rest of the wire. Wrap it around the stone and mark  where the other end just overlaps the filed end. Cut the wire just beyond the mark and file down to the mark making sure that the two ends meet without any gaps. Check that the bezel fits the stone snugly, but is not tight. Remove the stone, push the ends so they overlap and spring them back together so the metal’s tension holds them in place
Step 2
Use snips to cut out a small piece of hard solder.
Step 3
 Place the small piece of hard solder on a soldering block and place the bezel join over it so that the solder touches both sides of the join. Warm the join with the torch and drip a drop of flux into the join. Heat the bezel away from the join to expand the bezel to make sure the join is closed, and then heat the join until the solder melts and runs up the join. Put in warm pickle for a few minutes to remove the flux.
Step 4
Shape the bezel around the stone and then sand the bottom side flat on coarse grit sandpaper on a flat surface.  Wash and dry the bezel to remove any sanding grit. Reshape the bezel around the stone. If you have a cabochon with curved sides, be careful to shape the bezel to the base of the stone and not allow the bezel to bend in to fit the higher part of the stone. You should be able to easily push the stone into the bezel from the top of the bezel when it is on a flat surface. If you can’t, lightly tap the excess solder at the bezel seam with a suitable hammer on a metal mandrel to slightly expand the bezel. If the bezel is too loose, saw or snip open the seam, file some silver off the ends, and solder again. When the bezel fits, file and/or sand the outside at the seam until the seam is invisible.
Step 5
Lightly sand one side of the 24 ga silver sheet (the base plate) with 600 grit sandpaper to clean it. Coat both sides 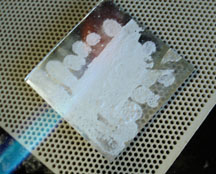 with firescale-preventing flux by applying it with a brush onto the heated silver (do not overheat: the silver needs to be just above boiling water temperature so that the flux forms a crust when applied to the metal). The flux can also be applied with a fine spray bottle if there is sufficient ventilation to carry the spray away from your lungs. If the flux forms lumps on the metal, heat the fluxed silver so that they flatten. Remember which side had been sanded.
Step 6
Place the bezel, sanded side down, in the centre of the sanded side of the fluxed base plate and drip or paint some 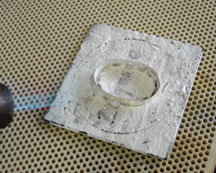 flux where the two touch. Warm with the torch to dry the flux and apply small pieces of medium solder so they lie flat on the base plate, touching the inside of the bezel. Using a fairly large flame, keep the flame moving over the piece while avoiding directly heating the bezel. If the solder moves away from the bezel, gently push it back with a soldering pick. When the solder starts to melt and you can see a shining silver line where the bezel meets the silver sheet, move the torch around the join to draw the solder all the way around the bezel. Cool the piece under running cold water and pickle to remove the flux. Check the solder seam between the bezel and the base plate; if there are gaps, flux everything again, and re-heat to re-melt the solder. You will have to melt the solder for some distance either side to get it to flow into the gap.
Step 7
Use a pencil to draw around the stone on a piece of paper and draw the outline of the pendant around it. Draw a line 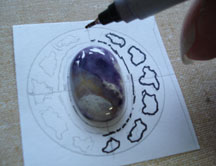 around the stone a short distance away from where the edge of the bezel would be (you could also do this step after Step 6, and draw around the bezel with the stone inside). Draw the pierced design and then go over it with a fine-tipped, waterproof, pen.
Step 8
Use a glue stick to apply glue to the 0.75mm or 22 ga silver sheet (the overlay plate), and to the underside of the 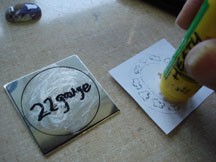 paper pattern, and stick the two together. Allow to dry.
Step 9
Use an automatic or hand centre-punch to create a dimple near the centre of each part of the design that needs to be cut out, and one a few millimetres inside the edge of the large central hole so that the drilled hole will not touch the drawn line.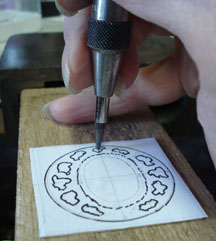
Step 10
Using a small drill in the flex shaft or in a drill press, drill holes in each dimple.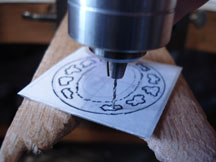
Step 11
Put a fine saw blade in one clamp of a jeweller’s saw (I put it in the bottom one by the handle). Make sure that the 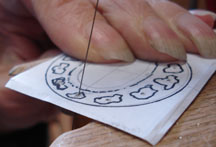 teeth of the blade point downward and are on the side of the blade away from the saw frame. Thread the blade through one of the small pattern holes. With the silver sheet resting at the end of the blade near the handle, attach the top end of the blade to the top clamp of the saw frame. Tension by pushing the handle into your body as you do this, or after attaching the blade by releasing the frame’s side wing nut and using your thumb to push apart the top and bottom parts of the frame before tightening the nut again. Cut out the pattern hole, and remove the blade by releasing the top clamp and withdrawing the blade. Repeat with the other pattern holes, and then cut out the large central hole.
Step 12
Use a half-round needle or inside ring file to refine the shape of the large central hole so that it is a constant 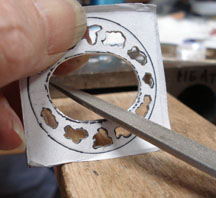 distance from the bezel when placed over it on the base plate. Round off the edge of the hole on the paper side of the piece.
Step 13
Use half-round needle and rat-tail files to also round off the edges of the pattern holes on the paper side of the piece.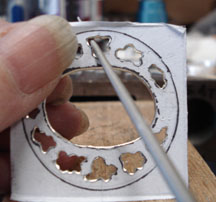
Step 14
Saw just outside the outline of the pendant.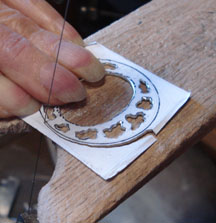
Step 15
File to the outline using a large file.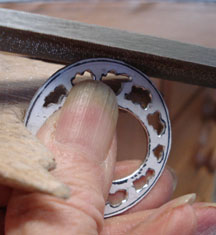
Step 16
Lightly sand the bare side of the overlay plate and then remove the paper on the other side by running under the tap to dissolve the glue.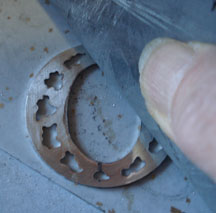
Step 17
Flux both sides of the overlay plate and place small pieces of easy solder on the sanded side. Heat until the solder 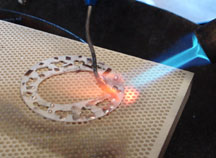 melts and use a pick to smear it over the whole of the plate. If the flux looks dirty, pickle to remove it, and re-flux the piece on both sides.
Step 18
Flux both sides of the base plate and place the overlay plate in the correct position. Heat with a large flame until a 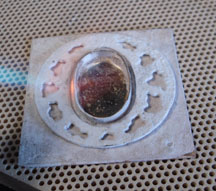 silver line of molten solder is seen around the edge of the overlay. Pickle to remove the flux.
Step 19
Saw around the overlay to remove excess base plate.
Step 20
File and sand until no line can be seen between the base plate and the overlay, making sure that the pendant shape is not distorted.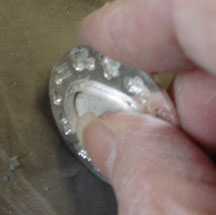
Step 21
Saw a bail from the sterling strip. The length and shape depends on the type of bail you want. I chose to make a hook bail and cut a piece that was about 3cm long, but a shorter piece would be needed if you wanted the bail to be 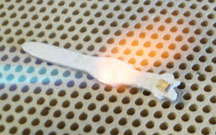 hidden as a simple loop on the back of the pendant, or a longer piece could be used if you like a long bail. For a hook bail like the one that I used, sand the edges of the bail, flux both sides, and melt a small piece of easy solder at the end where it attaches to the pendant. If the solder looks clean, flux over the solder without pickling.
Step 22
Place the bail, solder side down, in place on the fluxed pendant. Bending the other end of the bail down slightly will help the soldered end rest flat. Make sure that the bail lines up with an imaginary line down the centre of the 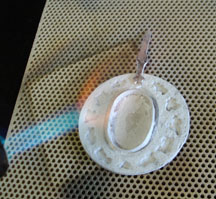 pendant. Heat the pendant and move the torch towards the bail without allowing the bail to heat up before the adjacent part of the pendant. Keep a soldering pick handy to nudge the bail back in place if it moves. Heat until the solder flows between the bail and the overlay. Cool under running water and pickle to remove flux.
Step 23
Sand the back and overlay to remove any scratches and/or firescale. This can be done by hand using 600 grit 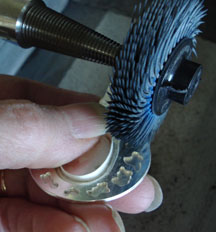 sandpaper wrapped around a suitable block of wood or rubber, or by using large 3M bristle discs on a polishing machine. Be careful to keep away from the bezel.
Step 24
Remove the sanding scratches on the back of the pendant and bail using a suitable abrasive compound on a muslin 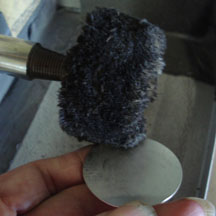 buff on a polishing machine. Tripoli is commonly used at this stage, but I prefer either Graystar or Euro Lustre, which I find more aggressive while leaving a more highly polished finish. Use your fingers or a VERY soft toothbrush to wash the piece with soap or liquid detergent to remove any abrasive compound, and then use rouge or Zip Polishing Compound on a flannel buff to give a high shine. If you prefer a satin finish or do not have a polishing machine, sand by hand with finer sandpaper grits, fine steel wool, or a brass brush in one direction.
Step 25
Protect the back of the pendant by covering with painter’s masking tape (I find that regular masking tape can etch the silver surface and become difficult to remove if left on too long).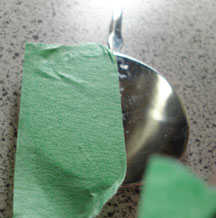
Step 26
Remove sanding scratches from the overlay, bail, and edges of the piece. I used a hard felt cone in my flex shaft with plenty of Graystar or Euro Lustre compound, cleaning the cone with the edge of a beer bottle cap frequently 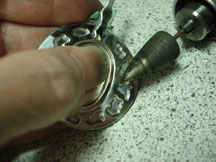 to stop build-up of silver or compound clumps on the felt that could produce scratches. You can also use a mandrel-mounted fine silicone wheel or cylinder. Whatever you use, it is important to keep it moving so that the silver surface stays flat and does not become undulated by abrading it in one spot for too long. Silicone wheels and cylinders also should be cleaned frequently by touching the rotating head against a clean paper towel held over the edge of a block of wood, as they can pick up tiny bits of silver and start scratching your work. Wash the piece to remove polishing compounds.
Use a 1mm round bur in your flex shaft to texture the recessed areas on the front of your pendant. If you wish, you can use a commercial blackening compound, or liver of sulphur, to darken the textured areas. Wash well under 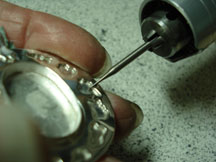 running water.
Step 27
Insert the cabochon into the bezel. If the cabochon has straight sides, push the protruding edges of the bezel down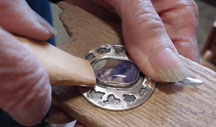 onto the stone; if it has curved sides, push the bezel against the stone starting at the base of the stone and working upwards. Start by pushing at the top and bottom end, and either side, of the stone to hold it in place, and then work your way around the stone. I use a home-made boxwood bezel pusher, but a metal one will work as long as the surface is well polished so it does not scratch the bezel (or the stone if your hand slips).
Step 28
Use a knife-edged, pink, silicone wheel to polish the bezel and remove any areas on the overlay that were 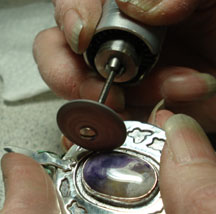 accidentally blackened from Step 28. Use a flat edged high-shine wheel or cylinder to polish the overlay, the front of the bail, and the edges of pendant and bail; clean the silicone every few seconds to prevent scratches.
Step 29
Use a soft buff and Zip or rouge polishing compound to lightly go over the bail and overlay to “soften” the black colour in the recesses and to remove the haze often left by silicone wheels. Clean the buff often with a beer bottle 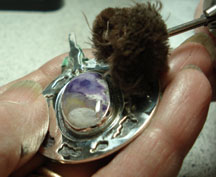 top, used only with Zip or rouge. Remove the masking tape from the back of the pendant and wash with soap or liquid detergent to remove any Zip or rouge.
Step 30
Using round-nosed pliers, bend the tip of the bail to the front of the pendant, and then bend the bail backward at an attractive length from the main part of the pendant.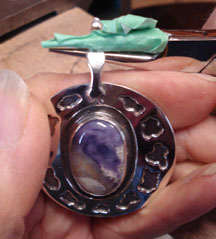
Step 31
Use flat-nosed pliers or a vice with plastic jaw covers, to squeeze the bail closed. Then admire your finished pendant!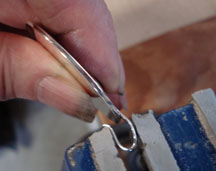
Submitted by Michele Heath of Vancouver Island
All the tools and materials to make this pendant are available on this website. Thank you for shopping!!