Humans have been casting metal for the past 5000 years! Our world without casting is unimaginable! Casting has also been used in jewellery making for thousands of years. One of the beauties of Water Casting is that it’s a fabulously fun, organic, craft jewellery casting process of pouring molten liquid sterling silver or gold into water to form interesting shapes – without molds and without spending thousands of dollars on casting equipment. These organic sterling or gold elements are then used to create one-of-a-kind pieces of jewellery. (This blog post focuses on using silver.) Watercast elements come out of the water in a variety of shapes and sizes. Sometimes you get exactly what you had in mind for the piece on your bench, but many times the shapes you get take your creation into an entirely different, but equally interesting and beautiful direction.
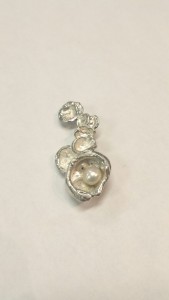
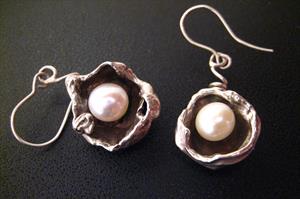
Here are a few examples of jewellery made either entirely using watercast elements or adding these elements to the structure of other pieces. The possibilities are endless!! Also, check out our PINTEREST PAGE and click on Casting – Water, Broom, Salt board for inspiration. I know an artisan silversmith whose entire jewellery line is created around watercast elements.


LET’S WATERCAST!!
YOU WILL NEED:
- a large bucket for the water – with a large bowl in the bottom of the bucket to catch the molten silver. If you don’t have anything in the bottom of a plastic bucket, you could melt holes in the bottom. It’s also easier to bring your castings out of the bucket if they’re in a bowl.
- Crucible (cup/dish and handle) with either a 6″ or 12″ handle. Make sure the crucible cup is SECURED into the handle – there will be a tension screw to secure the cup.
- Boric Acid (Borax or Aquiflux) to prepare your crucible cup and to apply to the silver while you’re melting
- a Torch hot enough to melt sterling silver to a casting temperature (to fully melt the silver into a molten liquid). I recommend the LittleSmith Acetylene/Oxy Torch, or the Smith Silversmith Air Acetylene Torch You can also use a MAP gas torch that you can purchase from a hardware store. The point is, you need LOTS of heat to melt metal into a molten/liquid form in the crucible.
FIRST PREPARE THE CRUCIBLE CUP/DISH: Crucible cups (also called a dish) are made of fused silica with clay bond and need to be “coated” with boric acid to create a “glass like” surface that facilitates the melting and movement of the silver in the cup. Some people sprinkle Borax powder (ya like the kind that use to be used for washing clothes) into the crucible cup, but I much prefer to use Aquiflux – all flux is essentially boric acid mixed with a liquid medium.
- Heat the cup with the torch.
- Fill about 1/4 of the heated cup with liquid Aquiflux and evaporate this liquid with the torch as you move the liquid around in the cup using the handle to move the cup gently from side to side and around.
- Because the Aquiflux comes in a spray bottle, it’s super easy to continue applying to the inside of the crucible cup by spraying and drying with the torch. The Aquiflux will turn into a white powder when heated with the torch, then will “melt” and create a “glassy” coating in the cup.
- Keep spraying the Aquiflux into the crucible cup and drying with the torch until you have a thin, even, “glassy” coating that covers the entire inside of the cup and the pour slots.
- Your crucible cup is now ready to start melting metal.
- This preparation is needed only with NEW cups.
NOTE: cups do need replacing when the boric acid coating becomes too thick or when it interferes with melting and pouring the silver – sometimes the coating gets holes in it, etc. No need to buy a whole new crucible – replacement cups are available HERE
WATER CASTING STEPS:
- Fill the bucket with room temperature water up to a couple inches from the top – make sure a large bowl is in the bottom of the bucket.
- Put a small amount (10 grams or less??? up to you) of small – cut up pieces of CLEAN (no solder) sterling or fine silver into your prepared crucible dish. It’s important that your silver not have solder on it, because the solder will also melt and change the alloy and colour of the silver.
- Spray the silver with Aquiflux
- While holding the torch with your non-dominant hand and the crucible by the handle with your dominant hand: Heat the silver in the crucible cup with the torch to “casting temperature” meaning it is in a molten liquid state. Roll the silver around in the cup to ensure it is completely melted.
- KEEP THE TORCH ON THE SILVER so that the silver stays in a molten form while you gently tip and pour the silver into the water.
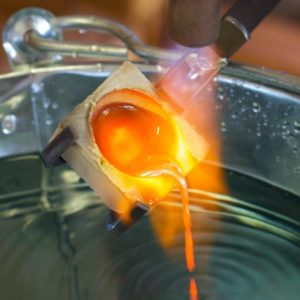
- You will get different results depending on the temperature of the water, the height from which you pour, and how fast you pour. I like to pour into room temperature water about 6″ above the water – but this doesn’t mean I always get the shapes I am hoping for. Water casting is Organic – meaning nothing is full proof with watercasting. You will also get different watercast shapes if you STIR the water just before pouring.
- If you’re not getting the shapes you want, you can remelt the silver, but eventually, the silver will SINTER and will not cast well, so after you’ve melted the same silver 2 times, add fresh scrap silver to the cup.
Here are some examples of what your watercast shapes MIGHT look like in element form:
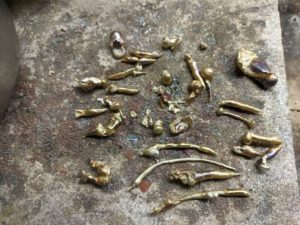
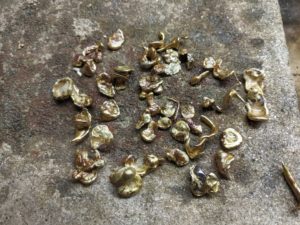
People often want “cups” of silver, but the spiral elements offer interesting possibilities as well.
Decide which elements you want to keep and pop them into the pickle pot to clean up. After they are cleaned, rinsed, and dry, they are ready to solder together into interesting shapes for pendants or earrings, or onto ring shanks, onto cuffs, etc, etc
When your jewellery pieces are finished (but BEFORE setting any Pearls or Stones), tumble polishing works best, but you can also polish small areas with 3m Disks.
If you’re setting Pearls or Stones into your finished WaterCast pieces – always do this LAST – after tumbling.
BE WELL & KEEP MAKING!!!