DOMED EARRINGS
Most fabricated pieces of jewellery start with a basic flat sheet of metal and/or some straight wire. Chasing or dapping the metal creates form and dimensional interest to these flat surfaces.
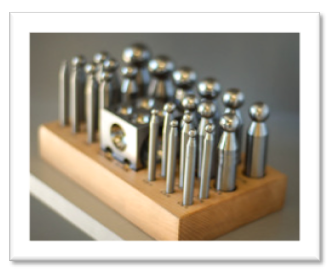
A Dapping Set is a useful tool for any level of silversmith. It can be used to create simple domed jewellery and also more complex pieces, including hollow forms and clasps.
Classic stud and pendant earrings using textured sheet metal and a dapping set with a block and punches can be made and used either convexly or concavely, doming metal opens the doors to many design possibilities.
What do you need to make these earrings?
Materials
- 22 gauge sheet in Sterling Sheet, copper, or brass
- Sterling earring posts or
- 20 gauge wire for ear wires
Tools
-
To cut the disks
You can cut the circular shapes from sheet metal using a jeweller’s saw. Mark your circles on the metal first with a compass or circular stencil or go free hand for a more organic shape.
Or you can use a Disk Cutter (unfortunately, Workingsilver is currently not selling disk cutters, but this is a fabulous tool to have in your studio!
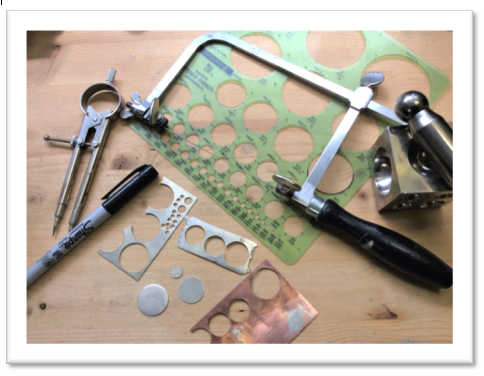
2. Texturing the Disks:
Texture the disks with a texture hammer, ball pein hammer, or rolling mill. Finish the edges with files and silicone disks. Note: Kathy used a ball pein hammer for her pendant earrings and a rolling mill texture for her studs.
3. If your design calls for Ear Wire:
Drill a hole using a drill bit slightly larger than .81mm (the size of your ear wire).
Use 20 gauge wire for earring hooks,
Use a center punch and drill bits to make a hole for suspending wire hooks or a jump ring.
4. To form the disks:
To shape the flat disk into a dome, use a dapping block. Place the disk into the first indentation of the block that is smaller than the diameter of your disk. Strike the disk with a punch, using a Brass Hammer. We recommend using either our stubby brass hammer or our 1lb brass head hammer. Experiment and find what works best for you and your projects! Hold the punch at an angle and work progressively in a circular manner around the disk. Continue to shape the dome with progressively smaller diameter punches and indentations until you reach the shape you want. The dome should turn slightly as you strike it on its interior surface. Note: Use either dead soft metal or anneal the discs before forming.
5. After Doming, Add the Ear Posts:
Solder on earring posts- depending on the size of your piece we supply 5 or 2.5 mm pad posts and have a variety of ear nuts in our “Findings” area to choose from.
Check out our blog: soldering station set up for more detailed information on soldering.
6. To finish disks
File the edges to correct the shape as needed if you have cut your circles with a saw. Whether you’ve used a saw or a disk cutter, the edges will need to be finished (smoothed) with silicone disks. These are used with a Flex Shaft and Mini Mandrels.
7. Polishing or Adding Patina:
Liver of sulfur or Silver Black are 2 Patina’s that are easy to use and give interesting colour to sterling pieces. Copper Disks (only) can be patinaed to a beautiful turquoise blue using ammonia and salt (overnight).
The absolutely best way to polish your finished pieces (that do NOT have a Patina) is to use a Tumbler with 2 lbs of Steel Shot. This will not only polish your pieces to a brilliant shine, it will not remove texture, and will further work harden the metal sheet and wire.
Design Considerations
You can use texture hammers, ball pein hammers, a rolling mill, etching, different metals, and patinas to alter the appearance of your disks. The creative possibilities are endless!!! You can also vary the shape of your earrings or pendant by sawing a geometric shape such as a diamond or square or flower before doming. Add gemstones or granulate with tiny balls!! Check out our Pinterest page for more domed jewellery inspiration!
Shopping List
- metal sheet. 22 gauge sterling for domed earrings but the gauge can be varied depending on the size and look you want for your project. Generally the smaller the dome the thinner the gauge. A thick piece of sheet in a small diameter indent will just take up the space and not dome. And keep in mind that the thicker the metal the longer it will take to dome. With large forms you could go as thick as 20 gauge, but we recommend keeping between 20 and 24, and no thinner than 28 gauge for very small pieces.
- 20 gauge wire for earring hooks or posts, available in Argentium, sterling, or gold filled. Check out our multi-size looping pliers – great for forming earring hooks!
- or use pre-made findings: earring posts, shepherd hooks.
- drill bits when using ear wires on your earrings
- dapping set Note: there are pros and cons to both wood and metal dapping blocks. Wood dapping blocks are good for maintaining texture on metal while metal dapping blocks are more durable and form metal faster. Size is also a consideration, our wood dapping blocks range in size from 2 1/2″ to 5/8″ (63.5mm to 15.9mm), our 24 metal dapping set from 25mm to 2.3mm, and our 8 punch set from 28 mm to 6mm.
- jewellers saw and saw blades (3/0 is a good all-purpose size – go smaller if you are sawing more intricate shapes)
- files, sandpaper, and silicone disks to finish the edges after sawing
- texturing hammers or ball pein hammer
- silicone bullets for finishing/polishing. Don’t forget mini mandrels! The reinforced (or screw type) mini mandrel is used with the 3M radials discs and the knife-edge silicone polisher, the threaded mandrel is for use with the bullet silicone polishers. Light Green 3M discs and a Brass Brush are great alternatives to a Tumbler for polishing your textured pieces.